Today was the first full day of spring, and while we’ve been experiencing beautiful, warm late-spring weather all week, surfing around 19°C most of the week, I can’t help but think Mother Nature has a cruel sense of humor when she gives us working stiffs these cool, near freezing weekends.
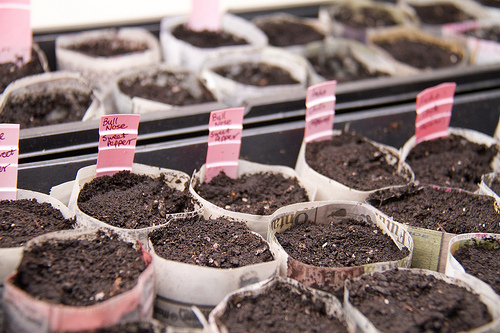
While I would love to have been working outdoors raking my lawn of all the winter detritus and maybe even planting some cool weather crops in my raised beds, I had to settle for potting my tomato and chili seeds.

I potted up over 90 paper pots of sweet peppers, tomatoes and chilies, and I’m not done yet! I’m still waiting for some tomato seeds in the mail so I’ll do the rest when I get those. I should also note that these are definitely not all going in my own little garden; I have at least three other folks, maybe more, who will take some of these babies off my hands. I also planted extras of the “Sarah & Chris’s Mystery Chili” — a chili I’ve been growing since the summer I met Chris. We don’t know what kind it is exactly. I originally bought it as a seedling from a garden centre in Stratford but I long ago lost the seed info. It’s a lovely little red chili only slightly smaller than a jalapeno with just the right amount of heat and flavour. Last year I harvested just 2 chilies, due to the cool, wet summer, so I’ve planted some of those seeds as well as some that are a few years old. Here’s hoping we get a proper summer this year — things are looking promising so far.
Paper Pots
I’m quite pleased with the paper pots so far. This is the first time I’m trying them out. We’ll see how they do over the coming weeks. I hope the paper won’t break down too fast. I found some more really great pot ideas in the last few days. Over at Dirt Happy there’s a nifty idea for square paper pots, as well as seed pots made from recycled toilet paper tubes. You can also do great things using both paper and plastic egg cartons (the plastic ones work great as miniature green houses). There are various videos out there like this one on how to use a glass to make a paper pot, but in this particular video the woman demonstrating is using a very large amount of newspaper and her method is a bit cumbersome (I can’t imagine making 100+ versions of these). You can use a wine bottle or even a square olive oil bottle for a similar result. Personally I found using the PotMaker from Lee Valley made the process very fast, and I used only a small 3.5 x 10 inch single layer of newspaper per pot (I’ve managed to make probably about 150 pots with a single newspaper).
Seed Markers & Transplant Pots
I was searching around online for a good bulk deal on small plastic seed markers (sold in Canada) and couldn’t really find anything. I’ve tried using Popsicle sticks in the past but they bleed and stain, making it hard to read after a few weeks. I’ve also tried those small bamboo barbecue skewers (the ones with the wide little “flag” on the end) but they have similar problems. I did find some very clever ideas for making waterproof seed markers though, like using plastic cutlery knives (I didn’t have any handy) and I bet you could use the biodegradable ones, although they won’t be cheap. I ended up cutting up some plastic beer cups we happened to have kicking around. It also occurred to me that I could use said cups as pots for when the seedlings need to be re-potted, instead of buying new plastic pots. Just poke a hole in the bottom. You could also use biodegradable/compostable ones — they’re fairly affordable now in bulk, and it would certainly be a very green option. We have both around from various barbecues (Mill Street sometimes gives us packages of the compostable kind when we pick up a keg), but since I bought the plastic ones several years ago, before I was thinking as often about green options, I’ll use the plastic ones up first. It’s better than just throwing them away and I’m sure I can use them for several years before they break down.